If you're here because you want to start with Selenium, you're in the right place.
This quick start tutorial is intended for complete beginners (no prior Java knowledge is needed), so we will cover project creation, manually add libraries and write code for one simple test scenario that will be executed in Google Chrome.
You'll also learn what are some basic elements of Selenium. If you prefer watching over reading when you study, scroll to the end of this tutorial, we also prepared a quick video guide. So, keep in mind this is plain, simple example without any additional frameworks and optimizations. After you catch up with these basic things, you can optimize, mavenize, etc your project as you wish.
So, this tutorial will cover the following subjects:
- what is Selenium and where we can use it
- creating a new Java project and adding necessary libraries for Selenium testing
- testing one basic scenario where we will select a search box, add search term, submit it and scroll to the end of the page
The tutorial contains two parts:
Prerequisites:
- latest Java installed
- latest Eclipse IDE - through this tutorial you'll see that I'm using STS, but I recommend you to use plain simple Eclipse
- Google Chrome browser
- no prior Java knowledge, but if you have it, it's a bonus
Introduction and project setup
Selenium is a framework made for automated testing. It's used to test and validate web applications across different platforms and browsers. Currently, it has support for the following languages: Java, Python, Ruby, C#, JavaScript, Perl and PHP. So, as you can see, it's very flexible and leading testing framework in the software industry. It's also important to mention that it's open-source software developed under Apache License 2.0.
Let's get started with coding...
1. Create a new Java Project, by clicking File -> New -> Java Project. You can also right-click to project list area and select New -> Java Project.

2. Name your project as you wish, mine will be called SeleniumDemoProject. Click Finish and you're done.

Under your newly created project, you'll see src folder and system JRE library (in my case it's 1.8, but any other one above it is also ok).

3. The next thing will be to download packages that will allow our application to execute Selenium tests. You'll need to download:
- Selenium server
Go to https://www.selenium.dev/downloads/ and download the latest stable version of the Selenium server.
In this moment it's 3.141.59.

- Selenium Java
In the same page where you found Selenium Server, find Selenium Client & WebDriver Language Bindings section.
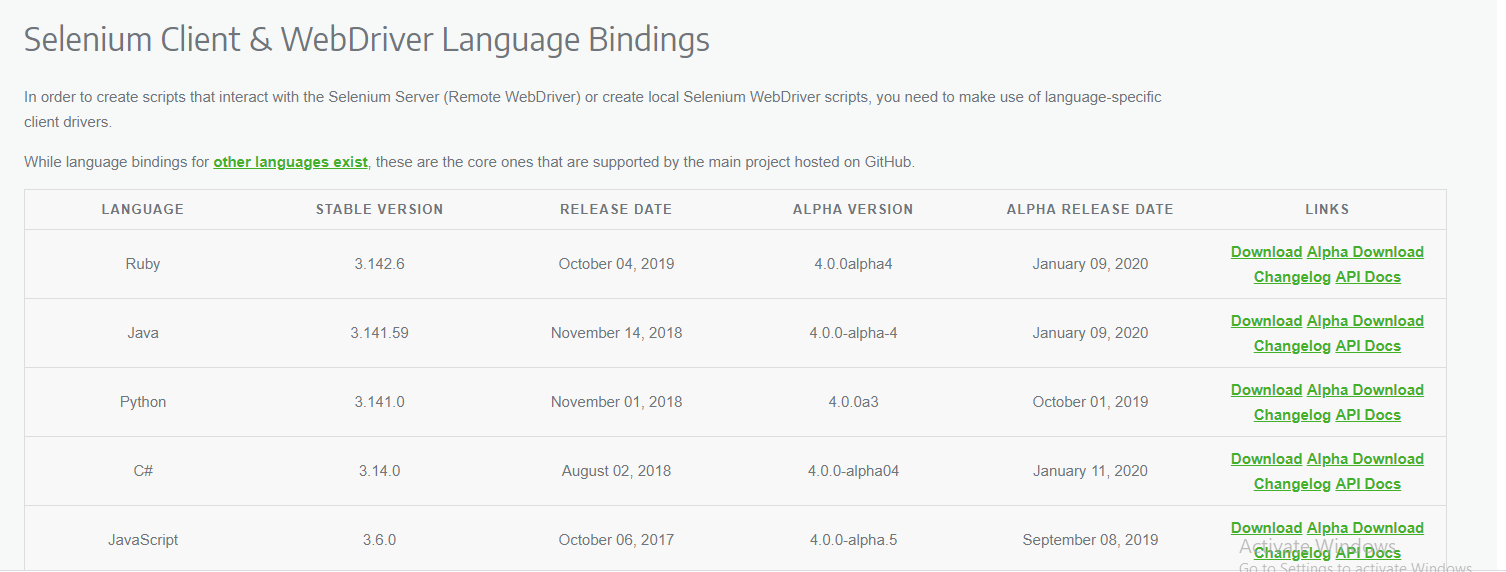
Download version for Java language.
- Chrome Web driver
Go to https://chromedriver.chromium.org/downloads and download the latest version of Chromedriver - Web driver for Chrome in correspondence of Chrome version you're using.

After that, pick the version for the platform you're using, and this is all concerning downloads.

4. Add packages to project
Put all the files you downloaded in the same folder. Extract chromedriver.exe from the zip archive.

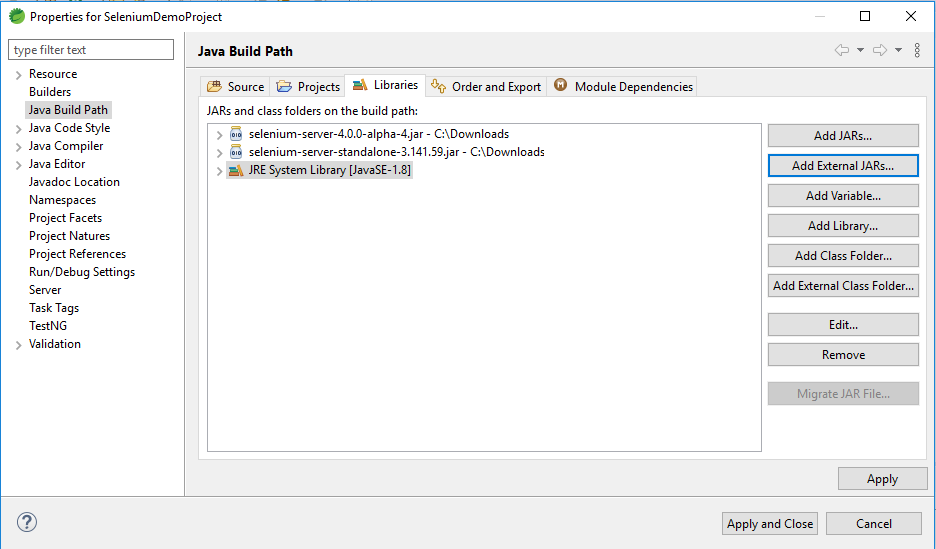
Righ-click your project and go to Build Path -> Configure Build Path.

On the following screen, click Add External Jar and add both Selenium server and Selenium Java you downloaded in the previous step. After you add them you should be able to see them in the jar list like on the picture below:
So, after we're done with adding libraries, it's time to start coding.
Writing Selenium first test case
5. Right-click src folder and pick New -> Package from the drop-down menu. Name your package com.test.

The same way you created package, right-click package you just created and add new Class. Name it SeleniumDemo (or other way if you like).
So, this is the final code and we will explain it line by line.
package com.test;

import org.openqa.selenium.By;
import org.openqa.selenium.JavascriptExecutor;
import org.openqa.selenium.WebDriver;
import org.openqa.selenium.WebElement;
import org.openqa.selenium.chrome.ChromeDriver;

public class SeleniumDemo {

	public static void main(String[] args) throws InterruptedException {
		System.setProperty("webdriver.chrome.driver", "C:\\Downloads\\chromedriver.exe");
		WebDriver driver = new ChromeDriver();
		driver.get("https://javahowtos.com");
		driver.manage().window().maximize();
		WebElement searchBox = driver.findElement(By.id("mod-search-searchword"));
		searchBox.sendKeys("spring");
		searchBox.submit();
		JavascriptExecutor jsExecutor = (JavascriptExecutor) driver;
		Thread.sleep(4000);
		jsExecutor.executeScript("window.scroll(0,10000)");
		Thread.sleep(4000);
		driver.quit();
	}

}
So, code executes within the main method. First line sets system property so your application knows where to find ChromeDriver which is necessary for browser interaction. In this tutorial, we're using Chromedriver, but you can pick Mozilla GeckoDriver for Firefox or Internet Explorer Driver for Internet Explorer. Depending on the driver you choose, property name will also be different:
- Chrome - webdriver.chrome.driver
- Firefox - webdriver.gecko.driver
- IE - webdriver.ie.driver
Also, depending on the browser you choose, you'll initialize different Driver class in the second line:
- Chrome - ChromeDriver
- Firefox - FirefoxDriver
- IE - InternetExplorerDriver
System.setProperty("webdriver.chrome.driver", "C:\\Downloads\\chromedriver.exe");
WebDriver driver = new ChromeDriver();
Following code gets the web page whose URL you set as a parameter:
driver.get("https://javahowtos.com");
Since the previous line will open the browser and load the page from the provided URL, we will put the browser into full-screen mode:
driver.manage().window().maximize();
Now, let's move to our test scenario. So, we first need to select our search box. To do that, we'll use Chrome Developer tools (Menu -> More tools -> Developer tools or just press F12). In the left top corner of the Developer tools screen, you'll see element selector (it looks like a little cursor in a square).
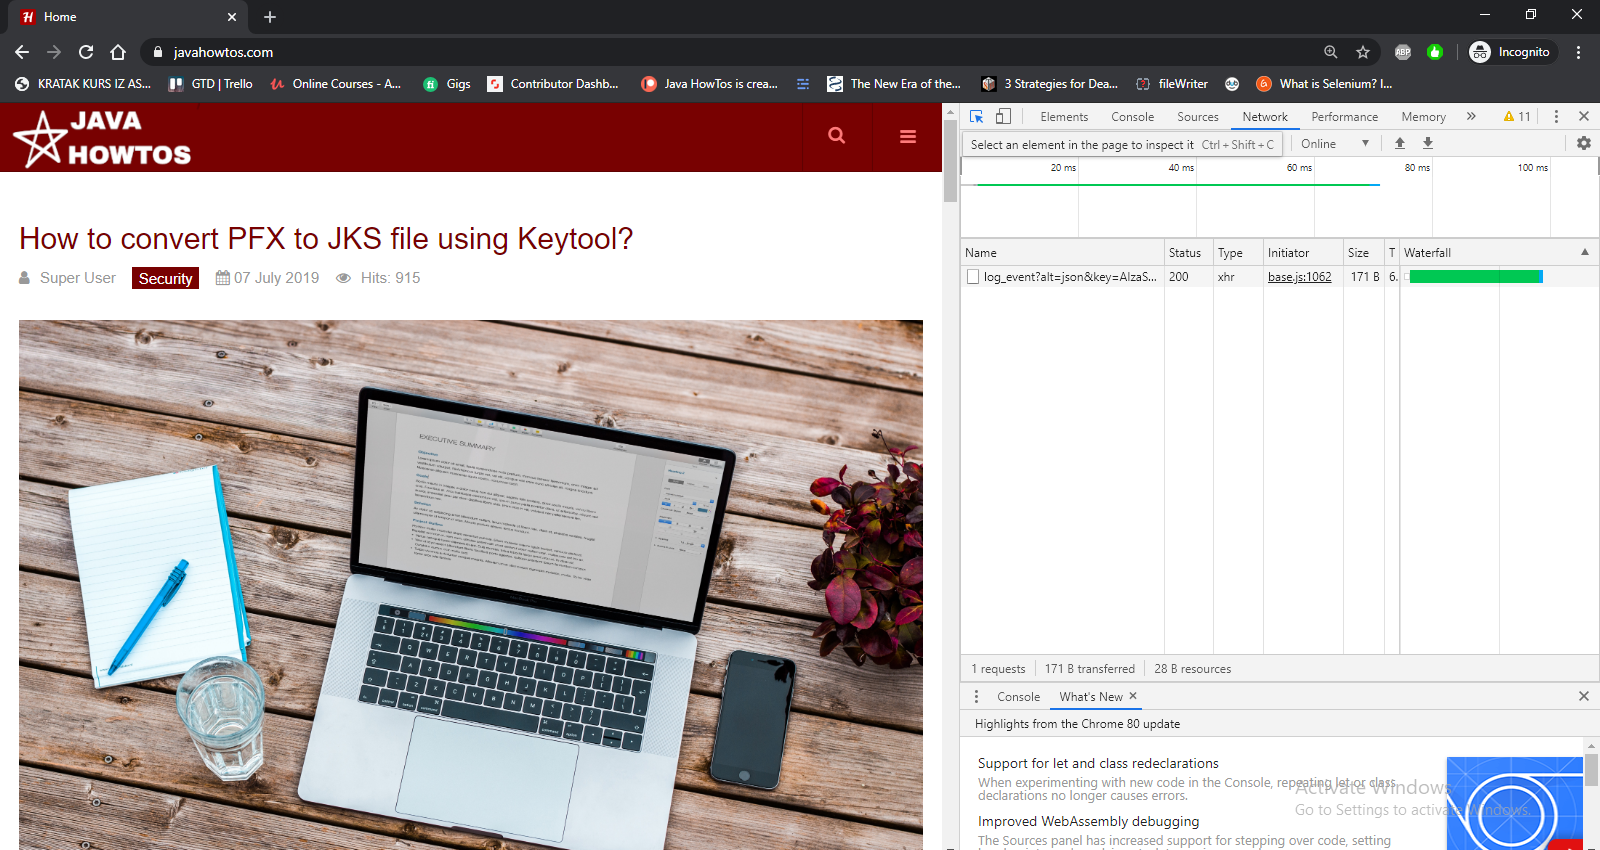
Use it to select search box where you'll find that box has id "mod-search-searchword". This is important because our web driver will locate this component through its id.
WebElement searchBox = driver.findElement(By.id("mod-search-searchword"));

We decided to search the website for the word "spring". To enter the search word and submit it (like you pressed enter after entering in box):
searchBox.sendKeys("spring");
searchBox.submit();
To scroll to the end of the page, we need to use the Javascript function window.scroll (xAxis, yAxis).
JavascriptExecutor jsExecutor = (JavascriptExecutor) driver;
Thread.sleep(4000);
jsExecutor.executeScript("window.scroll(0,10000)");
Thread.sleep(4000);
In order to use Javascript functions in Selenium, we need to use JavaScript Executor. What you need to do is just to cast a driver to JavascriptExecutor like in previous lines. Thread.sleep is used to make application wait for the page to load. So after the search is done, we wait for 4 sec for the page with search results to load, and after that we scroll and wait for 4 sec for scroll to complete before we call driver.quit() that will close all windows running under Selenium.
driver.quit();Right click on the project and select Run as -> Java Application. You'll see that the new browser window is loaded and that our case steps are being executed one by one. Checkout results in this video: